Rental Property Photography Tips: How to Take Photos That Fill Vacancies
Poor listing photos are the #1 reason good properties sit vacant. This guide covers how to photograph a rental property yourself — from preparation and lighting to camera settings and composition — including which rooms to focus on and how to edit photos for maximum appeal.

Last spring, I helped a landlord in Austin who couldn't understand why her recently renovated two-bedroom apartment had been sitting vacant for 47 days. She'd invested $12,000 in upgrades—new quartz countertops, modern light fixtures, fresh paint throughout—yet her inbox remained empty while comparable units in her neighborhood were getting rented within two weeks. When I looked at her listing, the problem was immediately obvious: her photos looked like they'd been taken during a power outage. Dark, blurry images shot from awkward angles made her beautiful renovation look like a dimly lit storage unit. After I shared some rental property photography tips and she retook the photos following basic principles, she had three qualified applications within five days. The only thing that changed was the photography.
This scenario plays out constantly in the rental market, and I've seen it hundreds of times over my 15+ years in property management. Independent landlords pour thousands of dollars into property improvements, spend hours crafting detailed descriptions, and price their units competitively—only to undermine all that effort with photographs that fail to showcase what makes their property worth renting. In an era where 97% of renters begin their search online, your listing photos aren't just important; they're the single most critical factor determining whether prospective tenants click on your listing or scroll past it.
The good news? You don't need to hire a professional photographer or invest in expensive equipment to capture compelling rental property photos. With a smartphone, some basic preparation, and the techniques I'll share in this guide, you can create listing images that attract qualified tenants and significantly reduce your vacancy periods. Whether you're photographing a studio apartment or a single-family home, these principles will transform your listings from forgettable to must-see.
In this comprehensive guide, I'll walk you through everything from equipment selection and lighting optimization to room-by-room shooting strategies and post-processing techniques. You'll learn how to stage spaces effectively, capture outdoor areas that sell lifestyle, and avoid the common mistakes that sabotage otherwise good listings. By the time you finish reading, you'll have a complete system for photographing your rental properties like a professional.
What You'll Learn in This Guide
- How to use natural and artificial lighting to make every room look spacious, bright, and inviting—even in challenging conditions
- The essential equipment and camera settings that produce professional-quality results without professional prices
- Room-by-room photography strategies for kitchens, bathrooms, bedrooms, living spaces, and outdoor areas
- Staging techniques that highlight your property's best features while minimizing distractions
- Post-processing workflows that enhance your photos without misrepresenting the property
- A complete photo shoot checklist you can use for every property turnover
Why Professional-Quality Photos Are Non-Negotiable for Landlords in 2026
The rental market has fundamentally shifted in how tenants discover and evaluate properties. According to recent industry data, the average renter views between 8 and 12 online listings before scheduling their first in-person tour. That means your photos aren't just competing against local properties—they're competing against the best-photographed listings your prospective tenants have ever seen. When a renter scrolls through dozens of options, listings with dark, cluttered, or poorly composed photos get eliminated in seconds, regardless of how great the actual property might be.
The financial impact of photography quality is substantial and measurable. Properties with professional-quality photos rent 32% faster than those with amateur images, according to multiple real estate photography studies. For a landlord with a $2,000/month unit, reducing vacancy from 30 days to 20 days represents $667 in saved carrying costs. Scale that across multiple properties or multiple turnovers per year, and photography quality directly translates to thousands of dollars in your pocket.
Beyond speed-to-lease, quality photos also affect the caliber of tenant inquiries you receive. When your listing presents professionally, it signals that you take property management seriously. This attracts tenants who value well-maintained living spaces and are more likely to treat your property with respect. Conversely, sloppy photos suggest a landlord who cuts corners—which tends to attract tenants with similar standards. When you learn how to write rental listing descriptions that match your improved photography, you create a cohesive presentation that pre-qualifies serious applicants.
The technology landscape has also evolved dramatically. Today's renters expect more than static images—they want to experience properties virtually before committing to an in-person visit. Platforms like VerticalRent allow landlords to syndicate listings with high-quality photos across multiple rental sites simultaneously, maximizing exposure while maintaining consistent visual quality. When your photos look professional across every platform, you build trust before you've ever met a prospective tenant.
Industry Insight: Listings with 20+ high-quality photos receive 83% more inquiries than listings with fewer than 10 photos. More importantly, these additional inquiries tend to convert at higher rates because tenants arrive at showings already confident the property meets their needs.
Perhaps most significantly, the bar for what constitutes "acceptable" photography has risen dramatically. Five years ago, a few decent smartphone photos might have been competitive. Today, with widespread availability of quality cameras and editing tools, renters have become sophisticated visual consumers. They can immediately identify poorly lit rooms, detect awkward staging, and spot attempts to hide property flaws through selective framing. Meeting these elevated expectations isn't optional—it's the minimum requirement for competitive listings.
Essential Equipment: What You Actually Need (And What You Don't)
One of the most persistent myths about rental property photography is that you need expensive professional equipment to get good results. In reality, the camera you already have in your pocket—your smartphone—is capable of producing stunning rental photos when used correctly. Modern smartphone cameras, particularly those released in the last three to four years, feature sophisticated computational photography that rivals dedicated cameras for real estate applications. The key isn't the equipment; it's understanding how to use it effectively.
That said, a few inexpensive accessories can dramatically improve your results. A compact tripod designed for smartphones costs between $20 and $50 and serves multiple critical functions. It eliminates camera shake that causes blurry images, ensures consistent height and angle across photos, and allows you to use longer exposure times in low-light situations without sacrificing sharpness. For landlords who photograph multiple properties regularly, a tripod is the single highest-return investment you can make.
| Equipment Item | Price Range | Necessity Level | Impact on Photo Quality |
|---|---|---|---|
| Smartphone (2022 or newer) | Already owned | Essential | High - foundation of your toolkit |
| Smartphone tripod with remote | $25–$50 | Highly Recommended | High - eliminates blur, enables consistency |
| Wide-angle lens attachment | $30–$100 | Optional | Medium - useful for small spaces |
| Portable LED light panel | $40–$80 | Recommended | Medium-High - crucial for dark spaces |
| Lens cleaning kit | $8–$15 | Recommended | Medium - prevents haze and spots |
| Dedicated camera (mirrorless/DSLR) | $500–$2,000+ | Optional luxury | High - but smartphone is usually sufficient |
A portable LED light panel is another worthwhile investment, particularly if your properties include rooms with limited natural light. Bathrooms, hallways, and basement spaces often lack windows entirely, and overhead fixtures rarely provide flattering illumination. A battery-powered LED panel ($40–$80) allows you to add clean, directional light that reveals details and creates depth. Position it off-camera to fill shadows without creating harsh reflections.
Camera Settings and Apps Worth Knowing
Your smartphone's default camera app is usually sufficient, but understanding a few settings can unlock better results. Most modern phones include a "wide" or "ultra-wide" lens option—use this for interior shots to capture more of each room in a single frame. However, be cautious of extreme wide-angle distortion that makes rooms appear unrealistically large or bends straight lines. A moderate wide-angle (equivalent to 24–28mm in traditional camera terms) provides the best balance of coverage and natural appearance.
If your phone offers manual or "Pro" mode, experiment with these settings: ISO should stay as low as possible (100–400) to minimize grain; shutter speed should be at least 1/60th of a second for handheld shots or slower if using a tripod; and white balance should match your lighting conditions. Many landlords find that dedicated camera apps like ProCamera, Halide, or Lightroom Mobile offer superior control and produce higher-quality raw files for editing.
Finally, keep your lens immaculately clean. Smartphone lenses live in pockets, bags, and hands all day, accumulating fingerprints and dust that create hazy, low-contrast images. A quick wipe with a microfiber cloth before each shoot takes seconds and noticeably improves clarity. This is such a common oversight that I include "clean camera lens" as the first item on every property photography checklist I use.
Mastering Light: The Foundation of Compelling Property Photos
Lighting is the single most important factor in real estate photography—more important than camera quality, staging, or editing skills. Good lighting makes spaces appear larger, reveals textures and details, creates emotional warmth, and communicates the quality of a property. Poor lighting does the opposite: it shrinks rooms, hides features, creates unflattering shadows, and suggests neglect even in well-maintained properties. Understanding how to work with light transforms average photos into compelling ones.
Natural light should be your primary light source whenever possible. The soft, diffused daylight that enters through windows flatters interiors in ways that artificial lighting struggles to match. However, the quality of natural light varies dramatically throughout the day. Early morning (7–9 AM) and late afternoon (4–6 PM) provide warm, golden light that creates inviting atmospheres. Midday light (11 AM–2 PM) is harsher and more neutral but provides maximum brightness for dark spaces. Overcast days actually produce ideal conditions—clouds act as a massive diffuser, eliminating harsh shadows and creating even illumination throughout rooms.
The direction of light matters as much as its quality. When photographing a room, position yourself so natural light comes from behind you or from the side, illuminating the space you're capturing. Shooting directly into windows creates extreme contrast that modern cameras struggle to handle—bright windows blow out to white while the rest of the room falls into shadow. If you must include windows in your composition, many smartphones offer HDR (High Dynamic Range) modes that capture multiple exposures and blend them to balance bright and dark areas.
Pro Tip: Schedule your photo shoots between 10 AM and 2 PM on partly cloudy days for the best natural lighting conditions. If you have properties with different orientations, photograph east-facing rooms in the morning and west-facing rooms in the afternoon when sunlight enters most directly.
Working with Artificial Light
While natural light is preferable, you'll frequently encounter situations requiring artificial lighting—bathrooms without windows, evening shoots, basement units, or properties with heavy tree coverage. In these cases, turn on all available light fixtures to maximize ambient brightness, but be aware that different bulb types produce different color temperatures. A room lit by warm incandescent bulbs, cool LEDs, and natural daylight simultaneously creates color casts that look unprofessional and are difficult to correct in post-processing.
The best approach is consistency: ideally, all fixtures in a property should have bulbs of similar color temperature (look for 2700K–3000K for warm white or 4000K–5000K for neutral white). If you're photographing a property with mismatched lighting, consider temporarily replacing visible bulbs with consistent ones or shooting during daylight hours when natural light overwhelms artificial sources. Some landlords keep a set of matching LED bulbs specifically for photo shoots—a small investment that eliminates color balance headaches.
When adding supplemental lighting with LED panels or other sources, aim for soft, indirect illumination. Bouncing light off a white ceiling or wall creates gentler shadows than pointing it directly at your subject. Position your supplemental light at a 45-degree angle to the camera to add dimension without creating unflattering flat lighting. The goal is to enhance what's already there, not to make the property look like a television studio.
Room-by-Room Photography Strategies for Maximum Impact
Different rooms present different challenges and opportunities for photography. A kitchen demands attention to surfaces, appliances, and workflow; a bedroom should evoke comfort and restfulness; a bathroom must appear clean and well-maintained above all else. Understanding what tenants look for in each space allows you to compose photos that answer their questions and address their concerns before they even ask.
Living Rooms and Common Areas
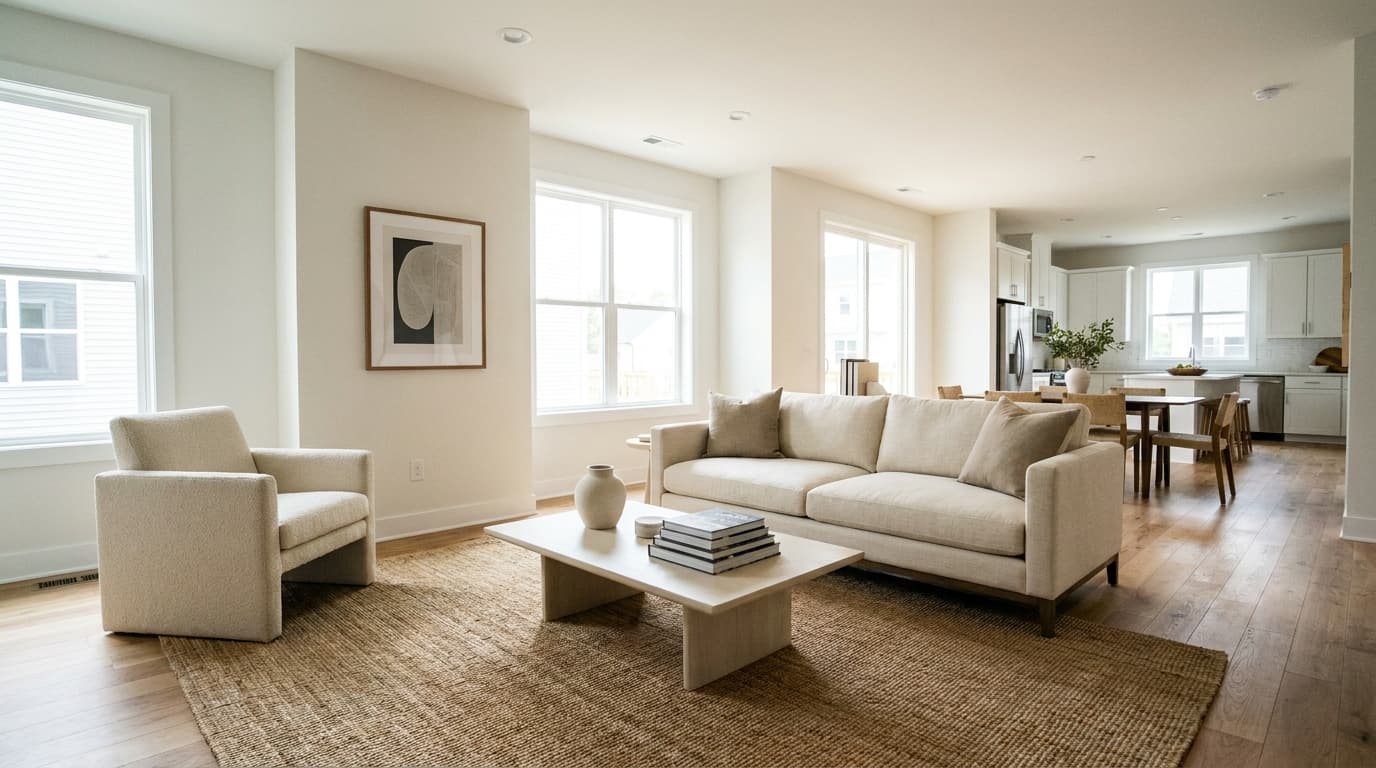
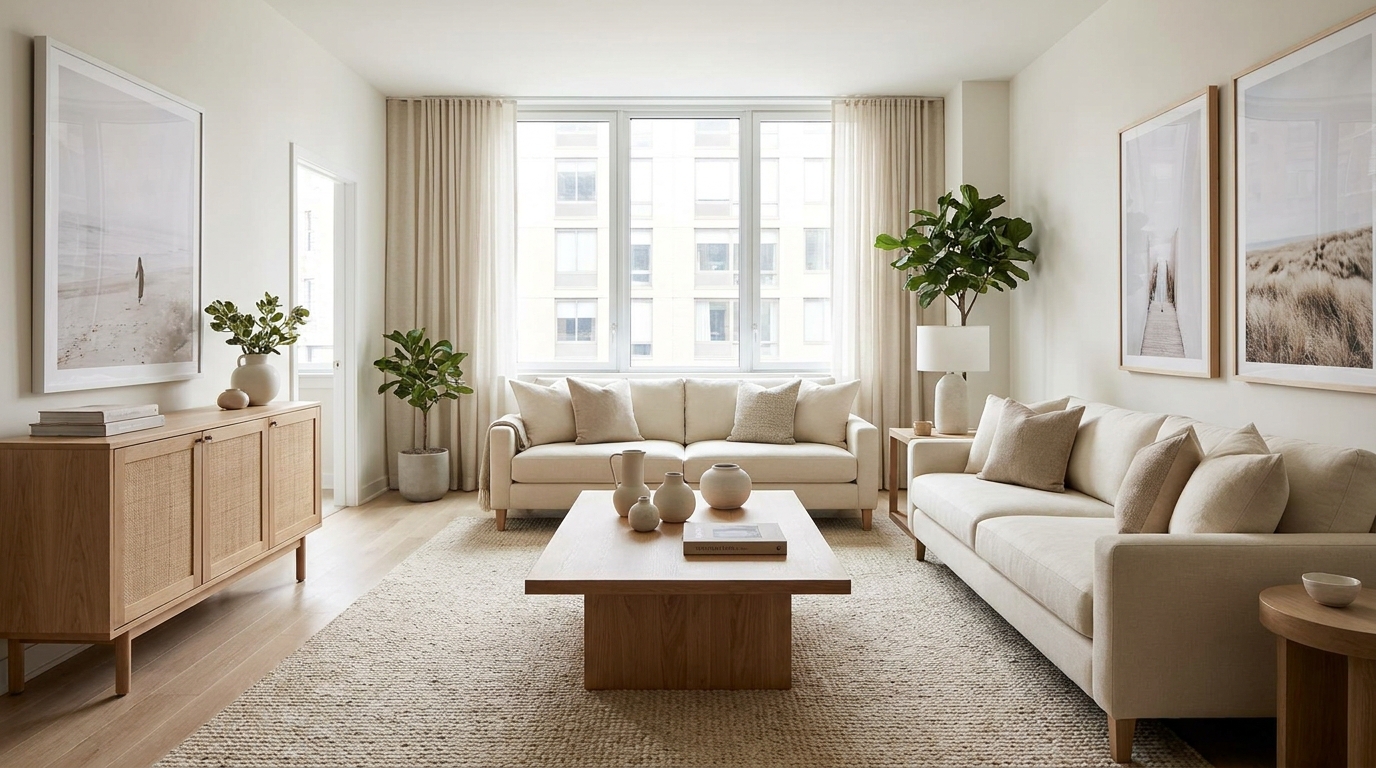
Living spaces are typically the largest rooms in a property and serve as the emotional center of any home. Tenants imagine hosting friends, relaxing after work, and making memories in these spaces—so your photos should facilitate that imagination. Shoot from a corner position to capture maximum floor area while showing the relationship between seating arrangements, windows, and focal points like fireplaces or built-in entertainment centers. Include at least one wide establishing shot and one or two detail shots highlighting attractive features.
Pay attention to furniture placement and flow. Seating should be arranged to suggest conversation and comfort, not shoved against walls to make the room appear larger (a common mistake that actually makes spaces feel awkward). If the property is vacant, consider whether minimal staging—a neutral area rug, a simple plant, a few throw pillows—might help tenants visualize the space's potential. Virtual staging has become increasingly sophisticated and cost-effective for vacant properties.
Kitchens: Where Deals Are Made or Lost
Kitchens consistently rank as the most important room for rental decisions. A well-photographed kitchen can overcome concerns about other areas; a poorly photographed one raises doubts even about properties that excel elsewhere. Ensure countertops are completely clear except for one or two intentional items—perhaps a fruit bowl or a small plant. Clear everything from refrigerator doors, remove trash cans from view, and ensure all cabinet doors and drawers are fully closed.
Shoot kitchens from multiple angles: a wide shot from the entry that shows the overall layout, a straight-on shot of the primary counter and cooking area, and detail shots of any premium features like stainless appliances, tile backsplashes, or high-end fixtures. If the kitchen is galley-style or otherwise compact, shoot from the doorway to maximize perceived depth. Lighting is crucial—turn on all under-cabinet lights, range hood lights, and overhead fixtures to eliminate shadows and create a welcoming glow.
Bedrooms: Selling Rest and Retreat
Bedroom photography is often straightforward because the rooms themselves are simple: typically a bed, perhaps a dresser, a closet, and a window. Your primary goals are demonstrating adequate space for standard furniture and communicating cleanliness and comfort. Shoot from the doorway or entry corner to show the full room, then capture the closet (open the door to reveal depth and shelving), any special features like built-in desks or window seats, and the view from the window if it's attractive.
Bedrooms benefit from warm, soft lighting that suggests restfulness. If natural light is too harsh, consider shooting on a cloudy day or diffusing direct sunlight with sheer curtains. Make the bed look irresistible—smooth, wrinkle-free bedding with properly arranged pillows signals care and comfort that resonates with prospective tenants. In vacant properties, even a simple bed with neutral linens dramatically improves bedroom photos compared to empty rooms.
Bathrooms: Clean, Bright, and Functional
Bathroom photography presents unique challenges: the spaces are typically small, mirrors create composition complications, and lighting is often unflattering. Success requires meticulous preparation and thoughtful technique. Remove all personal items, cleaning supplies, and trash receptacles. Ensure toilet lids are down, shower curtains are pulled back (or removed if unattractive), and all surfaces are spotless and dry. Water spots on fixtures, toothpaste residue in sinks, or soap scum on glass doors will be magnified in photos.
When composing bathroom shots, position yourself to minimize mirror reflections while still showing the overall space. Sometimes this means shooting from inside the shower or bathtub to avoid appearing in the mirror. Include close-up shots of any upgraded features—modern faucets, tile work, lighting fixtures, or storage solutions. If the bathroom lacks windows, supplemental lighting becomes essential; position a portable LED panel outside the doorway to add fill light without creating harsh reflections on tile and porcelain.
Staging Strategies That Make Properties Irresistible
Staging is the art of preparing a space to photograph at its absolute best while remaining truthful about what tenants will experience when they move in. Good staging removes distractions, highlights positive features, and helps prospective tenants visualize themselves living in the space. It doesn't require professional staging services or significant investment—just thoughtfulness about what each photograph communicates and willingness to invest preparation time.
Begin with aggressive decluttering. Remove everything that isn't essential to understanding the room: personal photos, excessive decorations, items on counters and tables, visible cords and cables, anything that draws the eye without adding value. This applies whether the property is occupied (coordinate with current tenants), recently vacated (remove all traces of previous occupancy), or staged for photos (resist the temptation to over-decorate). Empty spaces actually photograph better than spaces cluttered with staging items that don't serve a purpose.
After decluttering, add back only items that improve the composition or help tenants visualize livability. A few fresh towels rolled neatly in a bathroom suggest spa-like cleanliness. A simple plant on a kitchen counter adds life without clutter. Coordinated bedding and a few decorative pillows transform a vacant bedroom into an inviting retreat. These touches should be neutral in style and color—you want broad appeal, not a reflection of any particular aesthetic that might alienate potential tenants.
| Room | Items to Remove | Items to Add/Arrange | Staging Budget |
|---|---|---|---|
| Kitchen | All counter items, fridge magnets, dish rack, visible trash | One fruit bowl or plant, folded towel, clean cutting board | $15–$30 |
| Living Room | Excessive pillows, personal photos, visible cords, magazines | Two throw pillows, simple plant, coordinated blanket | $40–$80 |
| Bedroom | Personal items, excessive bedding, clothes, clutter on surfaces | Fresh bedding, two accent pillows, one nightstand item | $50–$100 |
| Bathroom | All personal items, cleaning supplies, old towels, bath mats | Fresh white towels, one small plant or candle, new soap dispenser | $20–$35 |
| Dining Area | Papers, mail, centerpiece clutter, mismatched chairs | Simple centerpiece (plant or bowl), coordinated place settings | $25–$50 |
Staging on a Budget: The Landlord's Kit
Many landlords maintain a portable staging kit that travels between properties. This kit contains neutral, reusable items that photograph well and fit multiple settings: white towel sets, a few throw pillows in neutral colors, an artificial plant that looks real in photos, a simple fruit bowl, neutral bedding for at least one size of bed, and perhaps a few basic decorative items like candles or small picture frames. The entire kit can be assembled for under $200 and pays for itself repeatedly through better photos and faster rentals.
Consider coordinating your staging items with a consistent color palette. White, gray, and natural wood tones photograph well in almost any property and appeal to the widest range of prospective tenants. Avoid bold colors, busy patterns, or trendy decorative styles that may date quickly or alienate renters whose taste differs from yours. The goal is to create a blank canvas that allows tenants to project their own lifestyle onto the space.
For vacant properties that need more substantial staging, virtual staging has become remarkably cost-effective. Services can digitally add furniture and décor to photos of empty rooms for $20–$40 per image. When done well, virtual staging is nearly indistinguishable from physical staging and can be customized to different furniture styles. Just be sure to clearly label virtually staged images in your listings to set accurate expectations—misleading prospective tenants destroys trust before the relationship begins.
Outdoor and Exterior Photography: First Impressions Count
While interior photos showcase livability, exterior and outdoor photography establishes first impressions that shape how tenants perceive everything else. A welcoming exterior suggests a well-managed property; a neglected one raises concerns about what lies inside. For properties with desirable outdoor spaces—yards, patios, decks, or balconies—outdoor photography also communicates lifestyle benefits that can justify premium pricing.
The front exterior shot is typically the primary listing image, appearing as the thumbnail that determines whether prospects click through to see more. This photo deserves extra attention. Shoot from an angle that shows the full façade while minimizing distracting elements like utility boxes, neighboring properties, or parked cars. Slight angles (30–45 degrees from straight-on) often work better than perfectly symmetrical compositions because they add dimension and visual interest.
Timing matters enormously for exterior photography. The "golden hour" after sunrise or before sunset provides warm, flattering light that makes properties look their best. Overcast midday light works well for avoiding harsh shadows, though the results may appear flat without careful editing. Avoid shooting in harsh midday sun when shadows are short and contrast is extreme, or in deep shade when colors become muddy. If the property faces a particular direction, plan your shoot to capture the façade with direct or angled sunlight.
Weather Advisory: While sunny days seem ideal for exterior photography, partly cloudy conditions often produce better results. Light cloud cover softens harsh shadows while maintaining the cheerful, bright atmosphere that makes properties appealing. Avoid shooting immediately after rain unless you're specifically aiming for that dramatic wet-surface look.
Capturing Outdoor Living Spaces
Outdoor amenities like patios, decks, yards, and balconies have become increasingly important to renters—especially since 2020 accelerated appreciation for private outdoor space. Photograph these areas with the same care you'd apply to interior rooms: stage them to show usability (a few pieces of outdoor furniture, perhaps a potted plant), choose angles that maximize perceived space, and shoot in lighting conditions that make the space inviting.
When capturing yards, include visual references that communicate scale—a tree, a fence line, the edge of the property. Prospective tenants often struggle to judge yard size from photos alone; context helps. For decks and patios, shoot from inside looking out to show the transition between indoor and outdoor living, then shoot from outside to capture the full outdoor space. If the property includes desirable views—of landscaping, nature, or urban skylines—make these views prominent in your outdoor photography.
Don't forget parking areas, garages, and storage spaces. While less glamorous than living spaces, these utilitarian areas matter to tenants and are frequently neglected in rental listings. A photo of a clean, empty garage or a dedicated parking spot confirms amenities that might otherwise require verification. For properties where parking is a significant advantage—urban areas where off-street parking is scarce—highlight this feature prominently.
Composition Techniques That Transform Average Photos
Composition—how you arrange elements within the frame—separates compelling photos from forgettable ones. Even with perfect lighting and staging, poor composition can make a beautiful property look awkward or unappealing. Fortunately, a few fundamental principles can dramatically improve your results without requiring artistic training.
The rule of thirds is the most applicable composition guideline for real estate photography. Imagine dividing your frame into a 3x3 grid (most cameras can display this overlay). Position key elements—like a focal wall, a window, or an important piece of furniture—along these grid lines or at their intersections. This creates visual balance and guides the viewer's eye through the image. Avoid placing important elements dead center; slightly off-center compositions appear more dynamic and professional.
Leading lines draw viewers into photographs and create depth. In interior spaces, look for lines created by countertops, floor patterns, ceiling beams, or furniture arrangements that naturally lead the eye from foreground to background. Position yourself so these lines start near the bottom corners of your frame and converge toward the center or upper portions—this creates a sense of invitation, as if the photo is pulling viewers into the space.
Height and Angle Considerations
Camera height significantly impacts how spaces appear. Shooting from chest height (approximately 4–5 feet) typically produces the most natural-looking results for interior spaces, simulating the perspective of someone walking through the property. Shooting too high makes rooms feel small; shooting too low emphasizes floors at the expense of walls and ceilings. Find a consistent height that works for your properties and use your tripod to maintain it throughout each shoot.
Horizontal orientation (landscape) is standard for real estate photography because it captures more width and matches how listing platforms display images. Vertical (portrait) orientation occasionally works for specific features—a tall window, a staircase, or a narrow hallway—but should be used sparingly. Most rental platforms crop or awkwardly display vertical images, reducing their impact. When in doubt, shoot horizontal.
Watch your corners carefully. The corners of your frame often contain distracting elements—electrical outlets, door hinges, partial furniture—that clutter the composition without adding value. Slight adjustments to your position can often clean up corners while still capturing the essential elements of the space. Similarly, avoid cutting objects in half at frame edges; either include them fully or exclude them entirely.
Post-Processing: Enhancing Photos Without Misrepresenting Reality
Even well-shot photos benefit from post-processing—adjustments to exposure, color, and other parameters that refine the image. However, editing rental property photos requires balance: you want to present the property at its best while ensuring prospective tenants won't feel deceived when they visit in person. The goal is truth enhancement, not fiction creation.
Basic adjustments should address technical shortcomings while maintaining accuracy. Exposure correction brightens underexposed images or recovers detail from overexposed areas. White balance adjustment ensures colors appear natural, correcting the orange cast from incandescent bulbs or blue cast from shade. Contrast and clarity adjustments add definition that makes spaces appear crisp and well-maintained. These corrections make photos look like what your eyes saw when you captured them—compensating for camera limitations rather than altering reality.
Cropping allows you to improve composition after the fact, removing distracting edge elements or reframing to emphasize important features. When cropping, maintain the original aspect ratio (typically 3:2 or 4:3) for consistency across your listing. Straightening tools correct tilted horizons and converging verticals—lines that should be straight but appear angled due to camera position. This correction is standard practice and expected by viewers accustomed to professional real estate photography.
What Editing Crosses the Line?
While enhancement is acceptable, manipulation that misrepresents the property crosses ethical and potentially legal boundaries. Removing permanent features (stains, damage, structural elements) creates false impressions that frustrate tenants and waste everyone's time. Digitally enlarging rooms, altering views from windows, or adding features that don't exist constitutes deception that damages your reputation and may violate consumer protection laws.
Color correction should match reality, not fantasy. A photo where gray walls appear warm beige will disappoint tenants expecting the warmer tone. Similarly, oversaturating colors to make spaces appear more vibrant than they are creates a jarring disconnect at showing time. If you're uncertain whether an edit is appropriate, ask yourself: "Will a prospective tenant feel accurately informed or subtly deceived?" Trust your instinct.
Modern editing tools include powerful AI features that can dramatically alter images—removing objects, changing skies, adding furniture. While these tools have legitimate applications (virtual staging, for example, when disclosed), they make misrepresentation dangerously easy. Using VerticalRent to manage your listings helps maintain integrity; our platform is designed for straightforward, honest presentations that build trust with prospective tenants rather than creating expectations that reality can't match.
How Many Photos Do You Need—And Which Ones Matter Most
Quantity and selection both impact listing performance. Too few photos leave questions unanswered; too many can overwhelm viewers or include weak images that undermine stronger ones. Research on listing performance suggests an optimal range of 15–25 photos for most residential rentals, with exact numbers varying based on property size and the best rental listing sites 2026 platforms you're using to market your property.
Every listing should include certain essential images regardless of property type. The exterior/façade photo establishes first impressions. Wide shots of each major room—kitchen, living area, bedrooms, bathrooms—provide comprehensive coverage. Detail shots of attractive features—upgraded finishes, built-in storage, premium appliances—add value and differentiation. Outdoor spaces, parking areas, and community amenities (if applicable) round out the package. Missing any of these categories raises questions and reduces listing appeal.
Photo order matters significantly because many platforms display images in the sequence you upload them, and most prospects won't view the entire set. Lead with your strongest exterior shot, followed by the most impressive interior space (usually the living room or kitchen). Arrange subsequent photos in a logical flow that simulates walking through the property. End with outdoor spaces and amenities that suggest lifestyle benefits. This structure tells a coherent visual story that maintains engagement throughout.
Quality Over Quantity: Curating Your Selection
Every photo in your listing should serve a purpose. Before uploading, review your entire set and ruthlessly eliminate weak images: photos with poor lighting, blurry focus, unflattering angles, or redundant coverage. Multiple similar shots of the same space do more harm than good—they suggest indecision or padding rather than thorough documentation. Select the single best image of each area and move on.
Consider what each photo communicates. A closet photo that shows depth, shelving, and organization options adds value. A closet photo that shows a dark rectangle adds nothing. A bathroom shot that captures the entire space with good lighting builds confidence. A bathroom shot with awkward reflections and harsh shadows creates doubt. Tenants unconsciously evaluate the weakest photos in your listing when forming impressions; don't give them ammunition.
For Virtual Property Tours, photo selection becomes even more critical. Interactive tours require consistent quality across every image because viewers will see them all in sequence. The immersive nature of virtual tours amplifies both strengths and weaknesses—a stunning photo becomes more stunning, but a problematic one becomes a glaring interruption. Invest extra curation time when preparing photos for virtual tour platforms.
Common Mistakes That Sabotage Your Rental Photos
After reviewing thousands of rental listings over my career, I've identified consistent patterns of error that landlords repeatedly make. Avoiding these common mistakes will immediately elevate your photos above the competition—many of which are still making these same errors.
Toilet lids up. This seems trivial, but open toilets photograph terribly and signal inattention to detail. It takes two seconds to close the lid and creates dramatically better bathroom photos. Similarly, shower curtains pulled closed hide the shower/tub area that tenants want to see. Pull curtains to one side or, if they're unattractive, remove them temporarily for the shoot.
Cluttered counters and surfaces. The most common staging failure is leaving items on surfaces—kitchen counters covered with appliances and utensils, bathroom counters with toiletries, dressers with personal items. Completely clear surfaces photograph dramatically better and make spaces appear larger and cleaner. Take the ten minutes required to remove everything.
Visible cords and cables
Put this into practice
VerticalRent tools related to this guide
Legal Disclaimer
VerticalRent and its authors are not attorneys, CPAs, or licensed legal or financial advisors, and nothing on this site constitutes legal, tax, or professional advice. The information in this article is provided for general educational purposes only. Landlord-tenant laws, eviction procedures, security deposit rules, and tax regulations vary significantly by state, county, and municipality — and change frequently. Nothing on this site creates an attorney-client relationship. Always consult a licensed attorney or qualified professional in your jurisdiction before taking any action based on information you read here.
Co-founded VerticalRent in 2011, growing it from nothing to 100k landlords and renters. Sold it in 2019, then re-acquired it in 2026 to make it better than ever.


